How to export video in blender is one of the most popular searches on google recently. Blender is a powerful tool for creating stunning animations. But once your animation is ready, the next step is to export it in a usable format like MP4. This guide will walk you through the process of rendering your animation to MP4 in Blender, along with some useful tips to ensure a smooth workflow. Whether you're new to Blender or looking to brush up on your skills, this guide has you covered!
Why MP4? 📁
MP4 is one of the most commonly used video formats due to its compatibility with most devices and platforms. It offers a good balance between quality and file size, making it perfect for sharing your animations online.
Step 1: Prepare Your Animation for Rendering 🎬
Before you start the rendering process, ensure that your animation is set up correctly:
- Set the Frame Range: Go to the Timeline at the bottom of the screen. Set the start and end frames for your animation.
- Check the Camera Angle: Make sure the camera is correctly positioned to capture the scene you want.
- Lighting and Shading: Ensure your scene's lighting and shading are finalized for the best visual quality.
Step 2: Select Output Settings ⚙️
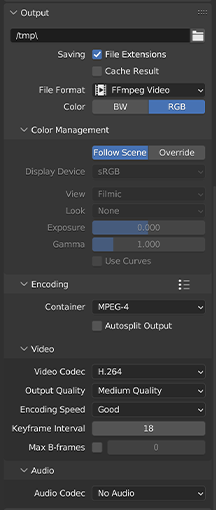
- Go to the Output Properties Panel: On the right side of the Blender interface, you'll find the Output Properties tab (printer icon). Click on it to open the settings.
- Set the File Format:
- Under the "Output" section, choose the directory where you want to save the rendered file.
- In the "File Format" dropdown menu, select FFmpeg video. This is essential for exporting to MP4.
- Choose the Encoding Settings:
- Container: Set this to MPEG-4 to ensure the output is an MP4 file.
- Video Codec: Choose H.264 for a high-quality MP4 file.
- Output Quality: You can adjust this based on your needs, but generally, "High Quality" is a safe choice.
Step 3: Render the Animation 🖥️
Once your settings are configured, you're ready to render your animation.
- Render Animation:
- Go to the top menu and click Render > Render Animation or simply press
Ctrl+F12. - Blender will start rendering your animation frame by frame and save it as an MP4 file in the location you specified.
- Go to the top menu and click Render > Render Animation or simply press
- Monitor the Progress: You can monitor the rendering progress in the top-left corner of the 3D Viewport.
Step 4: Finalizing and Saving the Video 🎞️
Once the rendering process is complete, your animation will be saved as an MP4 file in the output directory you selected. You can now watch your animation and share it on platforms like YouTube, Vimeo, or any other video-sharing service!
Troubleshooting: Common Issues and Solutions 🛠️
- Blender Crashes During Rendering: Ensure your system has enough RAM and that you're not running too many other processes simultaneously.
- Output File is Too Large: Try reducing the output resolution or lowering the bitrate in the encoding settings.
- Poor Quality Output: Check your render settings and ensure that you've selected the appropriate output quality and video codec.
FAQs: Answering Your Burning Questions 🔥
How do I export an animation from Blender to MP4?
Simply follow the steps outlined above: Set your output format to MPEG-4, select the H.264 codec, and render your animation. It will automatically save as an MP4 file.
How do I render an animation in Blender and save it as a video?
Blender’s rendering process allows you to save your animation as a video file. Choose FFmpeg as the file format and MPEG-4 as the container to ensure you save your animation as a video.
How do I export an MP4 animation?
By setting the file format to FFmpeg and selecting MPEG-4 as the container, your animation will be exported as an MP4 file after rendering.
How do I render After Effects to MP4?
Although this guide focuses on Blender, in After Effects, you can export an MP4 file using the "Adobe Media Encoder" and selecting H.264 as the output format.
Conclusion: Your Animation, Ready to Share! 🚀
Rendering your Blender animation to MP4 is a straightforward process when you know the right settings. With this guide, you’re now equipped to export your animations in a widely compatible format, ready to impress your audience! Whether you're working on a personal project or professional work, exporting to MP4 ensures your animation reaches a broader audience with ease.
Happy animating! 🎉